I recently had a client approach me with hours of digital video that needed editing. My video-editing colleague works on Adobe Premiere for Windows, and the drive containing the video was a Mac-formatted ThunderBay 4 drive from Other World Computing. We were therefore faced with two problems—which soon became three.

 Problem #1: Physically Connecting the Drive
The ThunderBay enclosure only connects one way: via the now-dated Thunderbolt 2 port. This port was primarily featured on Macs, starting in mid-2011. Apple began phasing out Thunderbolt 2 in 2015; and by this year, 2017, nearly all new model-year Macs* sport the speedier Thunderbolt 3 port, with its increasingly-prevalent USB-C connector. For a refresher on this change and my thoughts on it, click here.
* The 2017 MacBook Air still sports Thunderbolt 2; and Apple still sells laptops and desktops from as far back as 2013’s Mac Pro cylinder.
Regardless of the version of Thunderbolt, the bigger concern is that the editor’s PC tower didn’t support Thunderbolt at all. Despite being a technology developed by Intel, Thunderbolt never really made a splash on the PC side. With its lopsided support by Apple, I’m reminded of the old IEEE 1394 port, better known to Mac users as “Firewire.”

Spare a thought for FireWire (1994 – 2013). Source: networxsecurity.org
So how were we going to get this video onto that PC? Simple: move it to another hard drive, one that could connect to the PC.
We ordered G-Technology’s 8-Terabyte (TB) G-RAID with Thunderbolt 3; and when it arrived, we prepared to move the video files from the ThunderBay to it, via the client’s MacBook Pro.

The laptop was from 2015, so it still supported the older Thunderbolt 2 connection. As for the G-RAID, that connected via USB 3.1 Gen 2 (remember that?) as well as Thunderbolt 3; both using that same USB-C shaped plug. I used Apple’s Thunderbolt 3 (USB-C) to Thunderbolt 2 adapter, and the older MacBook had no difficulty recognizing the new drive. And the great thing about this new G-RAID drive, was that the editor’s PC supported USB 3.1 Gen 2, so there should be no problem connecting it… OR SO I THOUGHT.

The big drive on the left is the G-RAID, and the big drive on the right is the ThunderBay 4. The little pieces sitting on the laptop are Samsung portable SSDs, but this blog post isn’t about them.
Problem #2: Getting Over My ExFAT
In order to get a Windows PC and a Mac to recognize the data on the same drive, first you have to format that drive to be recognized by both operating systems. In most cases—say, with a USB flash drive (or “thumb drive,” if you prefer)—you would format it in the Extended File Allocation Table, or ExFAT. This format claims a drive ceiling of 128 petabytes (PB), according to NTFS.com. (NOTE: one petabyte is 1,000 terabytes). So we connected the G-RAID to the PC, formatted it as ExFAT, and Windows had no problem reading or writing to the drive.
And then we reconnected it to the Mac.
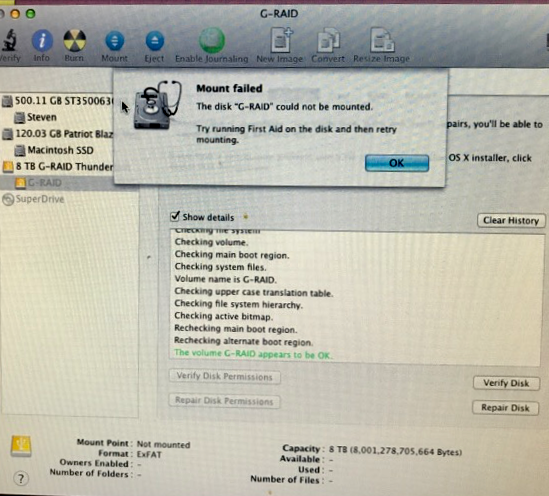
This is what happened when we connected our ExFAT drive, formatted in Windows, to a Mac. First Aid didn’t help.
So here we were with a new problem: even if you could physically connect the drive to both machines, only one would recognize it. That’s no way to transfer data!
After discussing the issue with the editor, we decided the best course of action would be to reformat the drive in Apple’s HFS Plus (Hierarchical File System) format. Luckily, there were a couple programs made for Windows, precisely to let that OS read and write to HFS-formatted drives. But which one to use?
Problem #3: Coke or Pepsi?
When clients ask me which of two tech products they should get—Mac or PC, iPhone or Android, Laptop or Tablet—I tell them, it’s a “Coke or Pepsi” decision, all tied up in their personal preference. Shopping for an HFS drive program for Windows was, at first glance, one of those choices.

Decisions, decisions… Source: Flickr.com
It came down to one of two programs: Mediafour’s MacDrive 10, or Paragon Software Group’s HFS+ for Windows 11. Unfortunately, I couldn’t just pick the one with the version number that was “one more.”
Mediafour’s MacDrive only has a 5-day free trial; and the purchase price is $49.99 per PC for the Standard edition, or $69.99 for the “Pro” edition. Here’s their comparison between the two versions: http://www.mediafour.com/software/macdrive/standard-vs-pro/

Source: mediafour.com
I compared MacDrive and HFS+ for Windows at macdrug.com, and while that comparison showed MacDrive indeed had more features, they weren’t necessarily features my colleague needed just to read and edit video files. Candidly, I read some iffy reviews about both programs, which you’re bound to encounter with any third-party software that purports to sidestep the built-in limitations of any OS. This was uncharted territory for me, so I wanted to be absolutely sure this would work before committing to anything.
I decided to take Paragon up on their 10-day free trial, and I downloaded HFS+ for Windows 11. If it was a hit, the final purchase price would be only $19.95 per PC. The editor would need this on both her Windows desktop and laptop, so that would be a total software investment of about $40.

Source: paragon-software.com
I’m happy to report that Paragon’s HFS+ handled the G-RAID masterfully. After installation, Windows 10 recognized the Mac-formatted drive as if it were a Windows drive; and all the files appeared as desired, with no corruptions or data loss. The editor was able to work directly off the G-RAID both on her desktop via its USB-C card; and on her laptop’s USB 3.0 port, via G-Tech’s included USB-C to USB-A adapter cable.

Note the USB-C connector on the left, and the classic USB-A connector on the right. Source: bestbuy.ca
While this experiment was a success, I’ve recommended to my colleague that she look into getting a new Mac with Thunderbolt 3 for future projects, so she wouldn’t have to force a Windows computer to work with a drive that wasn’t formatted for it. She’s inclined to agree; but between us, I think she’s hoping Apple will follow Paragon’s lead, and offer their computers with a free trial… and one longer than 10 days, if you please! ■
